flowchart LR
    A[Install Dependecies] --> B[Clone the repository]
    B --> C[Supply 3 files]
    C --> D[Enter Nextstrain shell]
    D --> E[Dry run]
    E --> F[Run Snakemake]
    F --> G[View in Auspice]
Tutorial: Nextstrain Phylogenies for seasonal H1N1, H3N2 and B/Victoria Viruses
Part 1: Downloading dependencies, building your environment, and running the tutorial dataset
Elgin Akin
2026-08-09
A couple of notes
Note
This tutorial is optimized to run on machines running MacOS. Users who desire to run this pipeline on Windows must refer to the WSL installation documentation provided by Nextstrain.
Warning
A little bit of systems and linux terminal navigation knowledge is expected before starting this tutorial.
- This tutorial will be a bit easier if you know how to do the following in a command-line interface:
- make a directory
- move in/out of directories
- check your current location
- Some knowledge of git/github is expected but not necessary.
What you will accomplish
By the end of this tutorial, you will:
- learn how to clone a github repository
- run the Pekosz Lab influenza Nextstrain workflow on a small teaching dataset;
- build eight segment phylogenies and one concatenated whole genome phylongeny for each subtype;
- create 27 Nextstrain builds across H1N1, H3N2, and B/Victoria; and
- open the results in Auspice.
The tutorial uses 20 samples per subtype and the same Snakemake workflow used for a normal production build.
The (simplified) path from tutorial setup to results
- This pipeline requires only 3 input files to run:
vaccines.fasta- (see tutorial: add vaccine strains from GISAID)sequences.fasta– sequences from the Johns Hopkins Hospital, manually concatenated runsmetadata.txt– metadata with one line per unique sample ID (excluding the segment) and associated metadata
Note
For this tutorial, all three files are supplied in the tutorial folder
Warning
You must run every command from the repository’s top-level nextstrain/ directory.
Before you begin: Install Dependencies
You need:
- macOS
- an internet connection (to download clades);
- Docker Desktop;
- the Nextstrain command-line Interface (CLI);
- this Pekosz Lab Nextstrain repository; and
- a terminal or IDE—Positron is recommended.
The workflow downloads current Nextclade datasets during the run.
Install and start Docker
- Install Docker Desktop for your operating system.
- Start Docker Desktop.
- Wait until the Docker engine reports that it is running.
- Verify it from a terminal:
If the command cannot connect, reopen Docker Desktop and wait for startup to finish.
Positron keeps the workflow in one window
- Install Positron.
- Select Terminal > New Terminal.
- Navigate to your desired repository location
- Clone the repository if you do not already have it:
- In Positron, select File > Open Folder.
- Open the top-level
nextstrainrepository folder.
- All commands that follow assume this is your current directory.
Vaccine GISAID sequences must come from the user
vaccines.fasta is not distributed with the tutorial because GISAID data cannot be openly shared.
Using your own authorized GISAID access:
- Download and format the vaccine sequences.
- Save the file as
tutorial/vaccines.fasta. - Do not commit or publicly share it.
Header requirements are documented in the vaccine tutorial.
No vaccine data? Use an empty placeholder
The workflow can run without vaccine references, but the expected file must still exist:
An empty file produces the clinical tutorial builds without adding vaccine strains.
Confirm all three inputs:
Verify the Nextstrain runtime
Install the Nextstrain CLI using the official guide, then check that the Docker runtime is supported:
You should see seomthing like this
❯ nextstrain check-setup
Checking for newer versions of Nextstrain CLI…

Nextstrain CLI is up to date!

Testing your setup…

# Checking docker…
✔ yes: docker is installed
✔ yes: docker run works
✔ yes: containers have access to >2 GiB of memory (limit is 7.7 GiB)
✔ yes: image is new enough for this CLI version
✔ yes: Rosetta 2 is enabled for faster execution (optional)
# docker is supported
Docker Desktop must remain open while you use Nextstrain.
Enter the reproducible environment
From the repository root:
Look for:
Then confirm Snakemake is available:
Keep this shell open for the remaining steps.
Check the workflow before running it
Perform a dry run inside the Nextstrain shell:
A dry run:
- checks the workflow graph;
- confirms that required input paths resolve; and
- does not create the builds.
Resolve any missing-file error before continuing.
Execute the tutorial
Inside the Nextstrain shell, run:
snakemakestarts the workflow.--cores 8allows up to eight CPU cores. Scale as needed--configfile config/tutorial.yamlselects tutorial inputs instead ofsource/inputs.
Note
The tutorial produces all 24 segment builds and three whole-genome builds. It uses the same workflow as a normal production run, but reads its starting files from this tutorial/ directory.
What Snakemake does for you (breifly)
flowchart LR
    A[classify segments] --> B[organize]
    B --> C[call clades]
    C --> D[filter]
    D --> E[align]
    E --> F[build, refine, annotate trees]
    F --> G[Export Auspice JSON]
Warning
Do not close the terminal or stop Docker during the build.
The Snakemake rules for the segment and genome nextstrain builds are as follows:
- Main File: Snakemake
- “Parts of a Whole” Files:
To generally learn more about Snakemake refer to https://snakemake.github.io/
What Snakemake does for you (source)

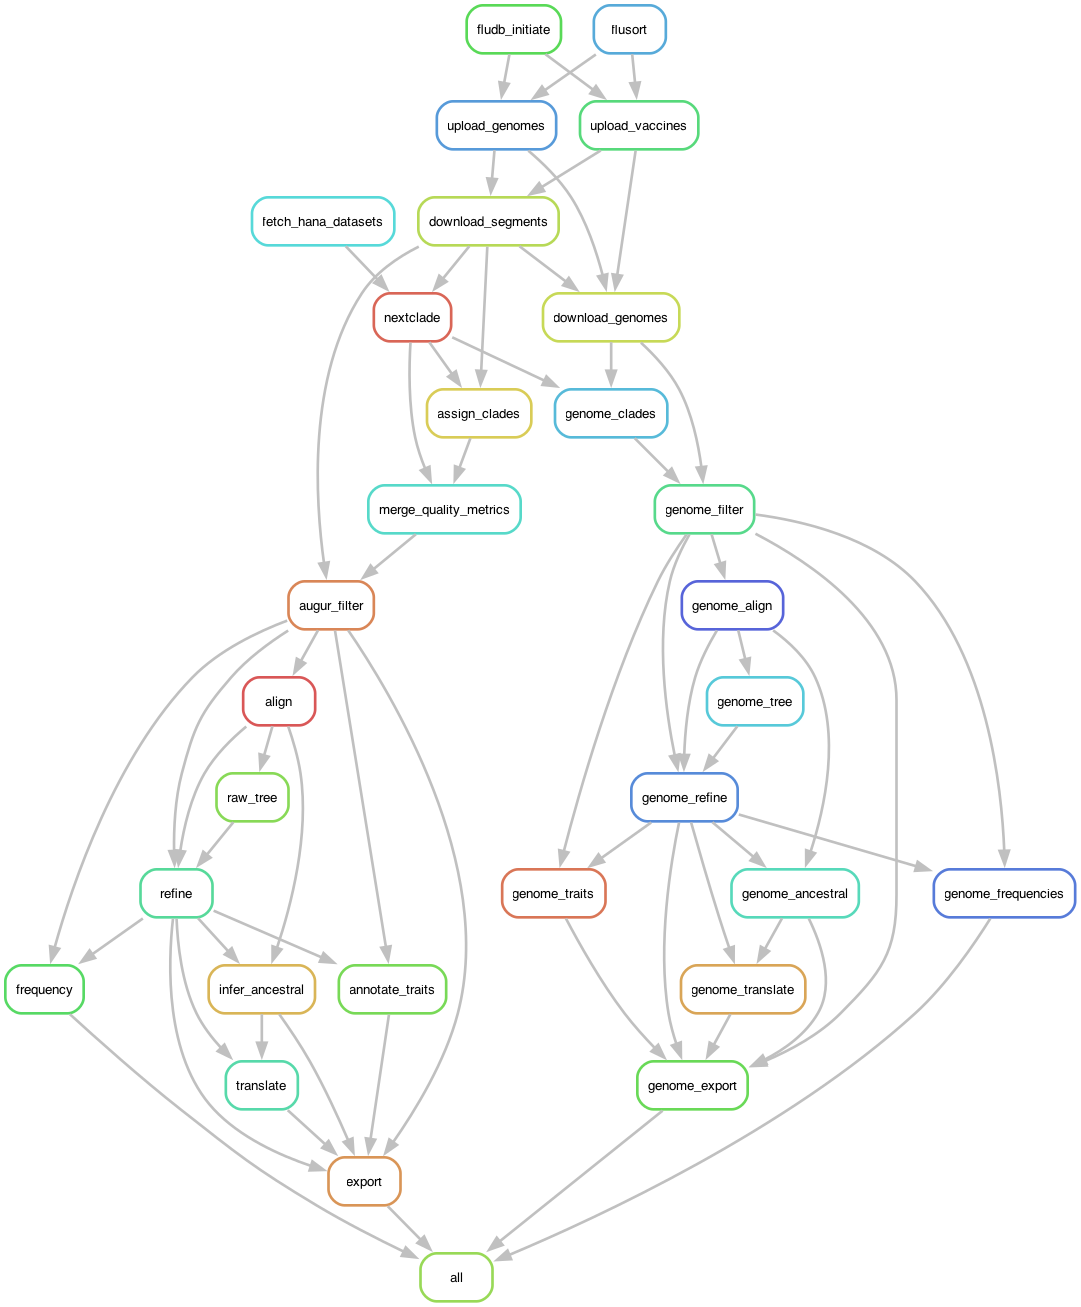
simplified rulegraph
Successful output has three branches
When the workflow finishes, inspect:
Each subtype directory contains:
- eight segment JSON builds;
- one whole-genome JSON build; and
- matching tip-frequency JSON files (sidecar file)
No red error message at the end means Snakemake completed successfully.
View a build at auspice.us
- Open auspice.us in a browser.
- Choose Drag & drop files.
- Drag one build JSON and its matching tip-frequency JSON onto the page.
Example for the H1N1 HA build:
Reload your web browser and repeat with any segment or genome build you want to explore.
Interrupted runs can continue
After correcting the cause of an interruption, rerun:
Snakemake reuses completed outputs and continues unfinished work.
Common checks:
- Is Docker Desktop running?
- Are you inside
nextstrain shell .? - Does
tutorial/vaccines.fastaexist? - Are you in the repository root?
Ready for a new run? Keep tutorial and production runs separate!
Both modes use the same downstream locations:
Use a fresh checkout or a clean workspace when switching modes.
To archive and clean an existing build:
This command removes build outputs after archiving them. Review the main README before using it.
The complete command sequence
Then open auspice.us and load a matching pair of JSON files from auspice/<subtype>/.
You are ready to build
The tutorial is reproducible when four conditions are true:
- Docker is running.
- The three tutorial input files exist.
- Commands run inside
nextstrain shell .. config/tutorial.yamlis selected.
Start with a dry run, then let Snakemake build all 27 influenza views.
Additional Resources
- This tutorial is based on the Pekosz Lab Nextstrain README documentation
- A written tutorial can be found HERE
Relevant Links
- The Pekosz lab Nextstrain Github: https://github.com/Pekosz-Lab/nextstrain
- The Pekosz lab Nextstrain Builds:
- Privately Hosted for internal meetings: https://nextstrain.org/groups/PekoszLab
- Publically Hosted for publications: https://nextstrain.org/groups/PekoszLab-Public
Pekosz Lab Nextstrain | H1N1 · H3N2 · B/Victoria Builds